Showing posts with label Guest Blogger. Show all posts

Wednesday, April 6, 2011

Easy & Inexpensive DIY Easter Bags Tutorial

See these personalized Easter bags?


They cost less than $5 each and took about 15 minutes to make.  Want to know more?  Then head on over to one of my favorite blogs, 30 Handmade Days, where I'm guest posting, for the full how to.  You can tweak this project to make so many different things - shirts, onesies, tote bags, hats.... you name it, you can personalize it easily and inexpensively.  How fun is that?

And while you're there, be sure to check out all of the fun projects that Mique shares. Some of my recent faves?  The Hoppy Easter Cupcake Printables:


Rainbow Rice Krispie Treats:


And this fun "I'm Sew Lucky" Printable idea that makes me want to throw a crafting party just so I can give these out as favors:


And there's so much more where those came from!  So head on over and check out my DIY Easter Bag tutorial and all of the other projects at 30 Handmade Days.


Thirty Hand Made Days

Tuesday, December 7, 2010

PROJECT SECRET SANTA: Four Cookie Recipes You'll Want to Make {FREEBIES}


As part of PROJECT SECRET SANTA, I reached out to some of my favorite bakers and asked them to share some secrets and recipes to help all of you with your holiday gifting and baking.

Today, I've got some amazing recipes from one of my blog buddies, Stacy from Scrumptious Swirls.  I had the pleasure of meeting her at the 
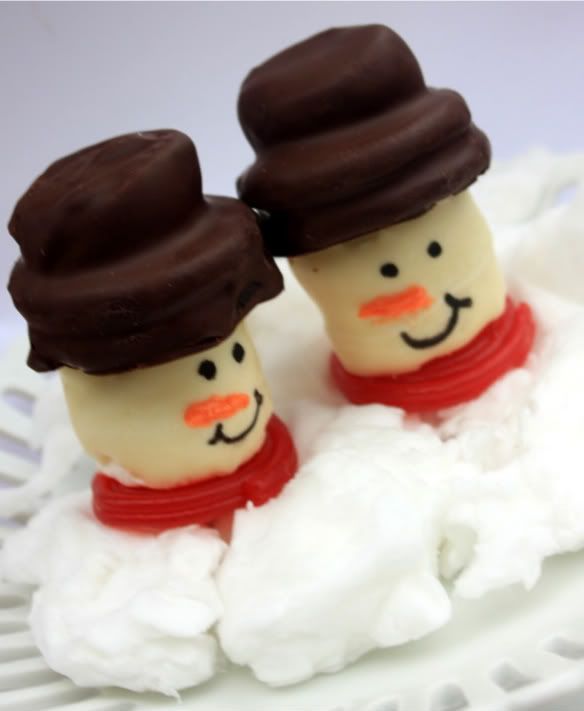
Martha Stewart Blogger Event back in August and to say that she's as sweet as the confections she conjures up would be an understatement.  Stacy is extremely talented and a nice person to boot which is why I love her so much.  And you won't believe the divine things she comes up with!  I mean really, how super duper cute are these Oreo Marshmallow Snowmen?


LOVE!  Okay, let's turn over this post to Stacy and her fabulous sweets.

I absolutely love baking during the Holidays and enjoy giving tins of cookies as gifts to my daughter’s teachers, my hair stylist, neighbors & family.  I also enjoy cookie exchange parties!  I hosted my first last year and I thoroughly enjoyed tasting my friends sweet treats and learning of some new cookies.  So here are four of my favorite recipes to get your holiday baking started!   


BISCOTTI
Biscotti is such a great cookie to make especially during the holidays because it makes for great gifts!  They're perfect with your morning coffee or your evening tea.

This recipe comes from the website Allrecipes.com.  You can chop nuts into this recipe, and instead of the anise extract add almond flavoring or maybe some vanilla.  Some biscotti recipes can be challenging or intimidating…this one is not at all!

INGREDIENTS:
1/2 cup vegetable oil
1 cup white sugar
3 1/4 cups all-purpose flour
3 eggs
1 tablespoon baking powder
1 tablespoon anise extract, or 3 drops anise oil

DIRECTIONS:
Preheat the oven to 375 degrees F (190 degrees C).  Grease cookie sheets or line with parchment paper.

In a medium bowl, beat together the oil, eggs, sugar and anise flavoring until well blended. Combine the flour and baking powder, and stir into the egg mixture to form a heavy dough.  Divide dough into two pieces.  Form each piece into a roll as long as your cookie sheet. Place roll onto the prepared cookie sheet, and press down to 1/2 inch thickness.

Bake for 25 to 30 minutes in the preheated oven, until golden brown. Remove from the baking sheet to cool on a wire rack. When the cookies are cool enough to handle, slice each one crosswise into 1/2 inch slices. Place the slices cut side up back onto the baking sheet. Bake for an additional 6 to 10 minutes on each side. Slices should be lightly toasted.


RUGELACH
This is my favorite cookie!  Not so easy but the end result is AMAZINGLY SCRUMPTIOUS to say the least!  Just remember - they don't have to be perfect.  Honestly, it took me a few times making these to get the hang of making them pretty but the taste not matter what is the best!!

This recipe is also from Allrecipes.com and if you haven't made Rugelach before, read the comments at the bottom for some tricks!

Make sure you chill the dough over night!  The recipe says 2 hours, but I tried that once and it didn’t work so well. When it says to wrap each disk, use parchment paper to cover, then wrap the disk in plastic wrap. When you roll again, keep it on parchment paper and roll it with a piece on top. Chop the filling in the food processor too - makes it easier and well blended!

Oh, and I don’t use the raisins - I use Chocolate Chips ;)

INGREDIENTS:
2 cups all-purpose flour
1/4 teaspoon salt
1 cup unsalted butter
1 (8 ounce) package cream cheese
1/3 cup sour cream
1/2 cup white sugar
1 tablespoon ground cinnamon
1 cup finely chopped walnuts
1/2 cup raisins

DIRECTIONS:
Cut cold butter or margarine and cream cheese into bits. In food processor, pulse flour, salt, butter or margarine, cream cheese and sour cream until crumbly.

Shape crumbly mixture into four equal disks. Wrap each disk and chill 2 hours or up to 2 days.

Roll each disk into a 9-inch round, keeping other disks chilled until ready to roll them.

Combine sugar, cinnamon, chopped walnuts, and finely chopped raisins (may substitute miniature chocolate chips for raisins).

Roll each disk into a 9 inch round keeping other disks chilled until ready to roll them. Sprinkle round with sugar/nut mixture. Press lightly into dough. With chefs knife or pizza cutter, cut each round into 12 wedges. Roll wedges from wide to narrow, you will end up with point on outside of cookie. Place on ungreased baking sheets and chill rugelach 20 minutes before baking.

Preheat oven to 350 degrees.

After rugelach are chilled, bake them in the center rack of your oven 22 minutes until lightly golden. Cool on wire racks. Store in airtight containers and they freeze very well.

Variations: Before putting the filling on the dough, use a pastry brush to layer apricot jam as well as brown sugar. Then add the recommended filling. You may also make a mixture of cinnamon and sugar and roll the rugelach in this prior to putting them on the cookie sheets.


MELT IN YOUR MOUTH SHORTBREAD COOKIES

These are great cookies if you want an alternative to sugar cookies.  I make these in addition at the holidays for my cut out cookies and decorate them!  Again with this cookie, when chilling wrap it in parchment paper, and for easier & cleaner rolling out use parchment paper.

Recipe via Joy of Baking (makes about 20 cookies)

INGREDIENTS:
1 1/2 cups (260 grams) all-purpose flour
½ cup of corn starch
1/4 teaspoon (2 grams) salt
1 cup (2 sticks) (226 grams) unsalted butter, room temperature
1/2 cup (60 grams) powdered (confectioners or icing) sugar
1 teaspoon (4 grams) pure vanilla extract

DIRECTIONS:
In a separate bowl whisk the flour & corn starch with the salt. Set aside.

In the bowl of your electric mixer (or with a hand mixer), beat the butter until smooth and creamy (about 1 minute). Add the sugar and beat until smooth (about 2 minutes). Beat in the vanilla extract. Gently stir in the flour mixture just until incorporated. Flatten the dough into a disk shape, wrap in plastic wrap, and chill the dough for at least an hour.

Preheat oven to 350 degrees with the rack in the middle of the oven.

Line two baking sheets with parchment paper. On a lightly floured surface roll out the dough into a 1/4 inch (.6 cm) thick circle. Cut into rounds or other shapes using a lightly floured cookie cutter. Place on the prepared baking sheets and place in the refrigerator for about 15 minutes. (This will firm up the dough so the cookies will maintain their shape when baked.)

Bake for 8 - 10 minutes, or until cookies are very lightly browned. Cool on a wire rack.

Shortbread cookies with keep in an airtight container for about a week or they can be frozen.


CHOCOLATE ESPRESSO SNOWCAPS
What would a cookie exchange party be with out a Martha Stewart recipe?!

Recipe & notes via Martha Stewart  (makes 18)

These cookies look like little snow-covered mountains. They will keep for up to a week stored in an airtight container at room temperature. Roll each ball in confectioners' sugar twice to make sure it's thoroughly coated and no dark dough is visible.

INGREDIENTS:
1/2 cup all-purpose flour
1/4 cup unsweetened cocoa powder
4 teaspoons instant espresso
1 teaspoon baking powder
1/8 teaspoon salt
4 tablespoons unsalted butter
2/3 cup packed light-brown sugar
1 large egg
4 ounces bittersweet or semisweet chocolate, melted and cooled
1 tablespoon milk
Confectioners' sugar, for coating

DIRECTIONS:
In a medium bowl, sift together flour, cocoa, espresso, baking powder, and salt. With an electric mixer, cream butter and brown sugar until light and fluffy. Beat in egg until well combined; mix in cooled chocolate. With mixer on low, gradually add flour mixture; beat in milk until just combined. Flatten dough into a disk; wrap in plastic. Freeze until firm, about 45 minutes.

Preheat oven to 350 degrees. Line two baking sheets with parchment. Shape dough into 1-inch balls. Pour confectioners' sugar (about 1/2 cup) into a medium bowl; working in batches, roll balls in sugar two times, letting them sit in sugar between coatings.

Place on prepared baking sheets, 2 inches apart. Bake until cookies have spread and coating is cracked, 12 to 14 minutes; cookies will still be soft to the touch. Cool cookies on a wire rack.

Thanks, Stacy!  Don't those recipes make your mouth water?  I'm not a baker but even I can't wait to get my hands in some flour to make some of these goodies for friends and family oh, who am I kidding?  For me, me, me!  If you're a better person than I am and want to give your cookies out, Stacy is sharing two free recipe card printables from the lovely ladies at Anders Ruff.  I love the From the Kitchen Of Cards (you can also see them in Stacy's pictures above):


And the blue and white Cookie Exchange Set is adorned with Ric Rac, which was actually inspired by Gabrielle and Alaina's birthday invitation.


A huge thank you to Stacy for sharing these fabulous sweets and the perfect free printables to go along with them.  Be sure to check out Scrumptious Swirls for more wonderful recipes and party ideas!

This feature was written as part of AFOMFT's PROJECT SECRET SANTA to benefit Jack's Toy Drive.  For more information on what it is, go HERE and if you'd like to buy a toy for a hospitalized child this holiday season, please visit the Jack's Toy Drive Amazon Wishlist.  Prices start at just $1.   Help put a smile on the face of a child who needs it this Christmas!

Images: Scrumptious Swirls, Joy of Baking, Martha Stewart & Anders Ruff

Friday, November 26, 2010

PROJECT SECRET SANTA: DIY Christmas Tree {TUTORIAL & DISCOUNT}

One of my favorite blog friends is Bird from Bird Crafts.  I'm sure you've seen me posting abut her parties here and on Facebook and if you haven't already, you really must check out her site.  In addition to sharing and planning fabulous fetes, like this Rainbow Party:


Bird also has some of the best tutorials around, like the how to for this cute cupcake stand:


That's what I love most about her - she doesn't just brag about her achievements.  She wants to help her readers create parties that are as amazing as hers are. 

So I was so excited when she signed on as part of PROJECT SECRET SANTA.  Bird put together a terrific tutorial for how to make some super sweet Christmas trees that will be perfect for decorating tables at your Secret Santa party or could be a great craft for the guests too.   Without further ado, here's Bird with all of the DIY details. 

TUTORIAL: Paper Xmas Tree Decoration

Thank you so much to AFOMFT for inviting me to take part in this worthy cause for PROJECT SECRET SANTA! I think the fact that Jack looked so adorable with his little Santa hat in the picture helped a lot - I just could not resist!! :)

As a mom of two young children myself, I can't even begin to imagine what Jack's parents must have gone through, and I'm very glad to be able to help in any way to Jack's Toy Drive in memory of such a beautiful little boy!!  

As I design and style printable children's parties, I thought today that I'd share a paper craft tutorial that's very easy and quick to make. These sweet paper trees will surely help to embellish any corner of your party table, mantle or kid's tables! Your little ones can also get stuck in and help with this easy and inexpensive craft! :)


What you'll need:

* FREE Paper Template - Download yours here
* Scrap-booking paper (I used the ones included in the Christmas Candyland Party Collection)
* Paper glue, hot glue
* Craft scissors
* OPTIONAL: Ribbon, buttons, pom-poms for embellishing the tops of the trees


Told you it was easy!

That's all folks, hope you've enjoyed the tutorial, and feel free to pop by Bird Craft Party Blogs for a chat and a slice of cake! ;)

XOXO

Bird


Isn't that fun?  And Bird has generously offered her Christmas Candyland Printable Collection to AFOMFT readers who buy a toy for Jack's Toy Drive at a 50% discount!  For just $7, you'll get all of these goodies:


CUSTOMIZABLE digitally by you:
* Party Invitation: 5" x 7"
* Rectangular food labels: 4 designs
* Fancy candy jar labels: 2 sizes
* Party signs: Use as table décor and more!
* Rectangular gift tags: 2 x Merry Christmas, 2 x Happy Holidays, 4 x "To and From" designs
* Blank Party labels: 4 designs to use as you wish!
* 2 " round gift tags: 2 x blank, 1 x Thank you and 1 x Merry Christmas


NON-Customizable Templates:
* Party icons: 2 sizes Candycanes, Robin. Use as toppers, table décor or use to make a garland!
* 2 patterned sheets: Festive Motif and Red and White Stripes
* Cupcake toppers: 6 designs, some read "Happy Xmas" and "Merry Christmas"
* Straw flags: 2 designs
* Welcome sign: 5" x 7"
* A4 Welcome sign 8" x 11"
* Candy bag horizontal labels: 2 designs that read "Take Out Xmas Candy"
* Cupcake wrappers: 2 designs


Who wouldn't love coming to a party with all of those marvelous printables?  To get the 50% discount, buy at least one toy from the Jack's Toy Drive Amazon Wish List and then fill out THIS FORM.  Once it's completed, you'll receive the discount code.

A hug thanks to Bird for being a part of PROJECT SECRET SANTA.  To stay up-to-date on all of the tutorials, parties and freebies she has to offer, be sure to visit all of her sites:


For more about PROJECT SECRET SANTA, check out this POST.

Monday, June 7, 2010

MULTIPLES MONDAY: Freezer Paper Stencil Tutorial

Welcome to MULTIPLES MONDAY, the CRAFTASTIC edition!  I wish I could take credit for this amazing tutorial but all of the kudos go to the uber talented Megan of MMMboppin'.  I found her blog after Lorie from the fabulous Be Different... Act Normal linked to one of my posts and Megan posted a comment in response.  She's a fellow-MoM so I automatically identified with her but once I saw her header....


I knew we were kindred spirits.  Any woman who quotes Hanson as words to love by is a friend of mine!

But enough about my bad taste in pop music.  Today's post is about some adorable TW-IN freezer stencil t-shirts Megan made.  You read that right - she made them!


And she tackled some TW-IN onesies too!


I know you want to make a set of your very own.  You're in luck because Megan's allowing me to feature her terrific Freezer Paper Stencil Tutorial here on AFOMFT!  And don't stop reading if you don't have twins.  You can make something fun for your little one - or yourself - too.  Let's get started!

Here's what you're going to need:


Freezer paper - you can buy this at the grocery store - it's like Waxed paper that's waxy only on one side

T-shirt or onesie

Exact-o knife 

Fabric paint

Sponge brush

A piece of cardboard

Something to cut on - a magazine will work

A design - For this onesie, Megan printed out an "S" for a friend's soon-to-arrive baby Susan.  You can find people's templates online, but she generally plays around with the fonts on her computer and gets free fonts at www.dafont.com. She also likes to use clip-art animal silhouettes.
And once you've got all the goodies handy, you're ready for the how-to:

    Step #1Cut a piece of freezer paper and tape it on top of your image. Place it so that the tape won't be on your image (ironing tape will make a sticky mess on your iron, so place the tape so you can cut or tear it off and not ruin your stencil later).


    Step #2: Begin cutting with your exact-o knife. The black parts are going to be the painted areas so cut away the black and keep all of the pieces that are white. When cutting the stencil, start by cutting away the pieces inside and working her way out. Throw away the black pieces that you won't need and hang onto the white parts that you will need as parts for your stencil later. Like this:


    Step #3: Once you're done cutting your stencil, prepare to iron it to your shirt. The waxy (it looks shiny) side of the paper needs to face the shirt when you begin ironing (keep that in mind when you are cutting your stencil!).  Megan secures the outline part of the stencil on the shirt first (she suggests looking at a copy of your design to help you figure out how it all needs to look).


    Step #4: Iron the inside parts of the stencil in place, so that the design looks the same as the one you started with (remember the parts that are black on your picture are the parts that will be painted).


    Step #5: Slide a piece of cardboard into the shirt to keep the paint from going through and then use your sponge brush to paint the shirt with fabric paint. Make sure you paint it pretty thick to cover the stencil well. Let the paint dry for at least 10-15 minutes.


    Step #6: After 10-15 minutes, peel off the stencil. If the paint is still wet, use caution so you don't smudge or smear it. First, grab a corner of the freezer paper and pull.  The outline stencil should peel right off the shirt. 


    To get the stencil pieces in the middle of the shirt that you're painted over, grab a pair of tweezers and pinch a piece of the inside stencil with them and pull. Works like a charm.


    Step #7: Take a step back and admire how dang cute your shirt turned out and imagine how adorable your favorite baby will look wearing it! Ta Da!


    Want to get a little fancier?  Try using a Cricut machine to cut out your stencils like Megan did for the stars above.

    For more great ideas and a daily dose of humor, be sure to visit Mmmboppin'.  Megan's blog is as catchy as the Hanson song it's named after, but a whole lot less embarrassing for me to admit to liking!

    If you try this project or have a CRAFTASTIC project of your own, we want to hear about it!  Send us an e-mail along with some pictures so we can feature your handwork here on AFOMFT

    Images: Mmmboppin'

    Monday, March 1, 2010

    MOMMY MUSINGS, PART ONE

    In honor or MOM MADNESS MONTH, I asked my good friend, Kirsten Hall, to share some of her thoughts on motherhood here on AFOMFT.  Kirsten is a children's book author (check out her website here!) and mom to two adorable boys.  We've known each other since high school and never would have thought back in the early 1990's when we were grooving to Bell Biv Devoe, drinking wine coolers and wearing way too much flannel that we'd be discussing some of the things we do today.  Nipple pigmentation?  Baby penile erections?  Hell to the no!  Our 17 year old selves were happily oblivious to what motherhood would one day have in store for us.  Kirsten's take on what we now deal with on a daily basis keeps me both entertained and grateful for the knowledge that someone else actually feels and wonders the same things I do.  Without further ado, part 1 of Kirsten's MOMMY MUSINGS: 20 THINGS I DIDN'T KNOW BEFORE BECOMING A MOTHER.

    1. I SEA SALVATION...
    Morning sickness sounded so wimpy. But holy crap, it can be rough. My "morning sickness" lasted for 2,160 straight hours. Outside of baked ziti and peanut butter, my only salvation was seabands. Seabands, which look a lot like Jane Fonda workout bracelets, are a most unfashionable accoutrement. They might even sell you out to the public while you're still quietly pretending that you're not growing a freaking parasite in your stomach. But they work. Ask my forever hicky-marked wrists. 

    2. MY BELLY BUTTON BLUES
    I've always hated belly buttons. I can't even clean my own. (I make my husband do it about once a year after I've had ingested a few glasses of liquid courage in the form of Sauvignon Blanc.) And so when my relatively inoffensive innie transformed into an outrageous outie in the matter of two mere months, I freaked. I felt like the little rebel was so big it might even hail a taxi without my meaning to. Luckily, after my son was born it crawled back into its dark and filthy hole where it has allowed me to continue on again in blissful ignorance, pretending it doesn't exist. Yeah, I'm mature enough to be a mother.

    3. TITS FOR TARGETS
    Bigger boobs, sore boobs, this was all to be expected. But the way my nipples became black, softball-sized circles was nothing I had ever in my worst nightmares anticipated. Then I read that what was happening to my nipples (the artists formerly known as cute and pink) was "normal." Another case of Mother Nature at her best, making sure our blind little babies have the same opportunity to find their mother's boobies as snipers hunting ill-fated presidents. Perhaps on women with bigger breasts, the ratio is less alarming. On my 34-B-on-a-good-day chest, my nipples felt so ginormous I was certain fussy newborns as far away as Tokyo were licking their lips at the distant sight of my milky gold mines.

    4. BREASTFEEDING CAN REALLY SUCK
    I was destined to be a milky, breastfeeding goddess. I looked down on women who bottle fed. They were lazy! They were selfish! They were unintelligent! And then I discovered my pancake chest (misleadingly massive nipples and all) was actually home to two, miserable "low producers." I hired a lactation consultant. One of her suggestions was that I lay in bed all day with my baby and let him feed as often as he needed to in order for us to work out our kinks—a feasible proposition had she also offered to split her hefty paychecks with me. Eventually I dragged my self-pitying butt over to Babies R Us where I bought a case of Enfamil. And then I began the lengthy process of digesting such a healthy portion of humble pie. And now? Three years later? I'd never have believed it, but I'm totally okay with it.

    5. LABORS OF LOVE
    How could one woman have two such different deliveries? With my first son, I hired a wacky doula to help me through my natural ("nonmedicalized," as she liked to call it) birth. But when my waters broke and my labor didn't start "naturally," I was forced to fire her inflammatory ass and fight my way through it all very differently than I had planned. A 24-hour labor, 3 hours of pushing, eventually a vacuum (I'd never heard of it either!), and he was born. My second son? 4 hours, total. I'd have been willing to get the epidural, but I didn't even need it. I walked. I watched the news. That big boy took ten minutes to push out. And unlike my first, whom I was paralyzed with fear might have extra limbs, this one could've looked like Freddie Krueger for all I cared.

    6. I (FINALLY!) LEARN HOW TO PLAY POINT-THE-PENIS
    Why did no one tell me to point the penis down inside the diaper? Why was the entire side of my son's crib lined with drying onesies for the first several months of his life? What I really want to know is: what good are those 500-page instructional "What to Know" tomes, anyway? Why do I need to know more about cleft palates than my son's ever-producing genitalia? 

    7. HONEY HORROR
    Ditto for honey. How does infant botulism fly so very far below the radar? For example, have you, new mommy, ever heard of it? Probably not. I certainly hadn't! But no matter who you ask, from your very doctorly pediatrician to your local herbal tea shop hippy, anyone in the know agrees that honey poses significant danger to your child one year and under. And by danger I mean the lethal kind. I've shared this fact with many new mothers and not a single one had a clue. So weird?

    8. HOW I HELP MYSELF
    How do I help myself as a mother? It's simple: I outsource some of my mommyness. I pretend I have a work meeting, but instead meet a girlfriend for a boozy lunch. I apologize to the nanny for being late after something important came up—like an Eat, Pray, Love premiereI ask the grandparents for help (ha!) when I need to help myself to a pedicure. At the end of the day, I've discovered, the better I treat myself, the better I treat my kids. It might not be entirely logical, but the math is definitely there to prove it. 

    9. MY GREAT EXPECTATIONS
    You don't know me, so I will state (and possibly even understate!) the obvious to my friends and family: I'm a control freak. But I'm learning with every passing day that I have little to really say about what is happening around me. My first son was barely out of my womb before I decided he would be a famous soccer player. (He'd play for Chelsea, obviously, since not only would he be sporty but he'd be hot, too.) But I've given up fuming when he throws the ball at the ceiling instead of kicks it. He shows zero propensity for soccer and I've learned not to care. So what if his face lights up at the word "make-up?" Who cares if he cares less about sports than stripping down to his underwear and wearing his blue blanket around the house as a dress? He's still adorable. And maybe he'll make it on Broadway, instead. That could be kind of cool, too!

    10. THE GIFT THAT KEEPS ON GIVING
    Sometimes my insecurities play themselves out on my kids. Put simply and obnoxiously, I want my offspring to be the best. The cutest, the smartest, the nicest, the everythingest! (Ew! I can't stand it but it's true.) So when I see that his preschool class has drawn seashells my heart starts to beat a little faster. Is his the one with the pretty, precise circles? The one with the awesome curvy lines? Not that one either? Where is it? Oh. The one with the lazy scrawl in its center. I'm not sure what to make of it. While it could scream "I don't give a crap!" it might also be a giant red "Get me an OT!" flag. Either way, I lift my chin higher. Who cares about dumb shell portraits, anyway? My son can read. He's gifted. (Do we all do this?) I straighten my shoulders and smirk a little. Shells. P-shaw.

    Like what you read?  Find Kirsten's children's book on her website Books by Kirsten and become a fan of hers on Facebook by clicking HERE.  Kirsten will be back next Monday with part two of her MOMMY MUSINGS.  In the meantime, we want to hear from you!  What are your thoughts, stories and feelings on motherhood?  Just grab our MOM MADNESS MONTH button from the sidebar, add it to your blog post and post your link here.  Sharing your MOMMY MUSINGS will enter you to win a Mommy Gift Pack featuring a Dobre Goods bag filled with Simply She note cards, a Lee Angel bracelet and other great goodies.  This giveaway is valued at more than $100!  So what are you waiting for?  Start musing!