Showing posts with label Blogs. Show all posts

Thursday, September 23, 2010

Make Your Blog a Book {GIVEAWAY}

When Gabrielle and Alaina surprised us by arriving 12 weeks early, my husband and I started a blog called And Babies Make Four.... to keep all of our friends and family updated on their progress.  The first few months of their lives were spent in the NICU, where we experienced some amazing moments as well as some truly terrifying ones.  Our family blog was an outlet for us during that time and I'm so glad that we have that record of everything we went through.  After both girls came home, I continued to post on the blog but with less and less frequency, and by their first birthday, Facebook became the place where we shared our pictures and updated on new milestones and achievements.  But the thing about Facebook is that I can't easily look back and see when Gaby took her first step or figure out when Alaina said her first phrase.  I really regret not posting more regularly on our blog so all things Gabrielle and Alain could be contained in one place.  Lucky for me, there's a way to assemble everything just the way I want it.

When Gabrielle and Alaina turned two, I decided that I would have our blog made into a book for them through Blog2Print, a website that transfers blogs on Blogger, Wordpress and Typepad into books.


It's such a simple process - enter in your URL, choose a cover design and whether you want a hard cover or soft cover and you're on your way.  You can include every post and picture or pick and choose (you can re-order them, too) and I love that you can also include the comments people left in your book as well.  I laid out more than 100 posts in no time.

But remember when I mentioned being able to incorporate all of the things I'd posted on Facebook instead of the blog?  That's where Everything2Print comes in.  On this site, you can access your Facebook photos, status updates, notes and more, and choose to include any of that information in your book.  In addition, you can add Twitter updates, pictures from Picasa, Word documents and PDFs.  When they named the site Everything2Print, they weren't kidding!  So all of those little things I posted on Facebook - funny moments, silly comments, etc. - are a part of our book now, too.

I am so excited to get my bound version of And Babies Make Four.... and I'll post pictures here once it arrives.  Just putting it together and reading all of the blog posts and messages we received made me extremely emotional.  Thanks to Everything2Print, someday we'll be able to sit down with Gabrielle and Alaina and read them the story of their miraculous road from 2 pound preemies to healthy, happy little girls without missing a step along the way.  Now I've learned my lesson and vow to get back to posting all about the girls on our blog.  But just in case I don't and slip back to my Facebook ways, I'm glad to know that those memories won't be lost. 


Want to publish your memories?  I've got great news - Blog2Print has generously offered to give away one 40-page book to a lucky AFOMFT reader!  To enter, leave a comment here telling me why you want to transfer your blog into a book (this is mandatory).  For additional entries:
  • Subscribe to AFOMFT or let us know you are a subscriber
  • "Like" AFOMFT on Facebook -- http://tinyurl.com/AFOMFTFBFAN
  • "Like" Blog2Print on Facebook
  • Ask your friends to "like" AFOMFT on Facebook by sending them this link - http://tinyurl.com/AFOMFTFBFAN - and post a comment here with the names of each one who does.  You'll earn one entry per new friend who "likes" our page and names will be cross-checked.  
  • Follow Blog2Print & AFOMFT on Twitter (@Blog2Print & @AFOMFT or click the birdie icon on the sidebar) and tweet this post by clicking the graphic above or this giveaway:  @blog2print lets you easily transfer your blog into a book. Want to #win a 40 page one? Head over to @AFOMFT now! http://bit.ly/di4lRz
  • Click here to vote for AFOMFT on Top Baby Blogs and post a comment here that you did - Vote For Us @ topbabyblogs.com Top Baby Blogs.  You can vote once per day per computer so if you vote every day or on different computers, be sure to post one comment for each one.
  • Grab our button and put it on your blog or website and post a link here showing us.
  • Blog or post on Facebook about this giveaway with a link to this post (worth 2 entries so please post two comments) and make sure your comments include a link to your status or blog post.
Please leave a separate comment for each entry (two if you've blogged about the giveaway) and make sure to include a link to your tweet, blog post, etc. All entries must be posted on AFOMFT as a direct comment to this post.  Comments on Facebook will not count as entries.  This giveaway is open to residents of the U.S. and Canada and ends September 30th at 11:59 pm EST. The winners will be selected by random.org and announced on AFOMFT on October 1st. If the winners don't contact AFOMFT within 48 hours, a new drawing will be held so be sure to check back to see if you've won!

Image: Blog2Print

Friday, August 20, 2010

Party Peeks

Sorry I was MIA yesterday but I am in full-on party planning mode right now.  Combine that with a full-time job, this blog and two toddlers and things get a little nutty.  But since I'm all about celebrations at the moment, I figured I'd share of a few favorites I've seen recently.

Without a doubt, the most creative theme around has to be this "One Year Old in a Flash" bash Stacy at Elle Belle threw for her daughter, Liv's, first birthday.


The invitations from Beyond Design are darling and perfectly captured the party's photography theme.


And Stacy came up with an amazing idea - to create a time capsule for Liv to open on her 18th birthday.  She asked all of the guests, including out-of-towners who might not be able to come, to send something to include in this memento.  Such a wonderful gift for her little lady! {this party found via Bella Grace Designs & photography is by Dawn at Elemental Image}

So many people write to me asking for unique themes for boy's parties and this one from Brandi of Brandi Brown Events has to be one of best I've ever seen.  For her twin boys' first birthday, she chose a Tom Sawyer & Huckleberry Finn theme, and together with the fabulous Kate Landers, from Kate Landers Events, she created something her guests won't ever forget!  Just take a look at the "hay couch" made to mimic the rustic vibe of life on the Mississippi.


There was perfectly themed - and kid-friendly - food.


And she even brought in live animals from a local zoo to delight the kids.


Amazing!  Read more about how Kate and Brandi brought this party to life here. {photos by Inga Finch Photography}

Kori Clark from Paper & Pigtails also came up with a one-of-a-kind theme, designing a stunning bash for her daughter's birthday based on Lilly Pulitzer's Tort Party ware.  The result was a Preppy Turtle party that girls of any age would die for.


I adore the gorgeous combination of patterns throughout the party and the small details that pull everything together.  Look at this divine this dessert table!


Again, the food was kid-friendly - Cheerios, powdered donuts and cupcakes were the perfect treats.

 
Get more details, as well as all of the source information, on the Paper & Pigtails blog. {photos by Courtney Vickers Photography}

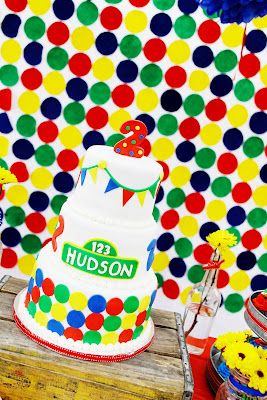
And last, but not least, this fantabulous Sesame Street themed soiree that Jenny Cookies threw for her son Hudson just knocked my socks off.  Even rain couldn't put a damper on this playful party.  The invitation from Less Ordinary Designs set the tone for everything.


From the cake:


And cupcakes:


To the games:


And goodies:


Guests even took home their own goldfish as favors!


Is that the cutest or what?

I hope you enjoyed a little peek at some fun festivities!  Do you have a favorite party or one you want to share?  We want to hear about it.  You could be featured in our next party round up.

Images: Elle Belle, Elemental Image, Brandi Brown Events, Inga Finch Photography, Paper & Pigtails, Courtney Vickers PhotographyJenny Cookies

Monday, August 9, 2010

GET ACQUAINTED WITH: High-Heeled Foot in the Door

I mentioned last week that I would be featuring some of the fantastic bloggers I had the pleasure of meeting at the Martha Stewart Bloggers' Night Out party and during the BlogHer Conference and I'm going to kick things off today.

I've been reading High-Heeled Foot in the Door for a while now so I was overjoyed when I met Camila, the lovely lady behind the blog, at Martha's bash.  She's starting her own interior design business and her site is filled with a mix of terrific posts all topped off with a big dose of Camila's humor and charm.  Some of my favorite features are Decorator's Handbook, which provides great tips on topics like how to determine how long your window treatments should be and how to pick paint, Open House, which takes you inside readers' homes (I adore this one on Julie W.), In Her Shoes, where you get to live a day-in-the-life of other bloggers, Blog Crush, which introduces you to amazing blogs you'll want to add to your reading list (I now have a huge crush on Mrs. Lilien, thanks to Camila!), and Before and Afters which as you can probably guess shows you how Camila and her handy hubby transform things from stale to stylish.  Check out this tired dining set before they got their hands on it:


And after:


Impressive, right?

When I introduced myself to Camila, I gushed about a post I'd just read on High-Heeled Foot in the Door and I'm so excited that she's letting me share it with all of you.

With Gabrielle and Alaina turning two in a little more than a month, their days of sleeping in cribs are probably numbered.  While I'm scared silly at the thought of the dynamic duo being able to roam freely around their room, I am looking forward to getting them beds along with adorable upholstered headboards.  I *love* upholstered headboards and have about 1,000 of them bookmarked as inspiration for the day we put together their "big girl" room.  So when I saw Camila's Tufted Headboard tutorial, it was right up my alley.  How fabulous is this?


Take a closer look - the combination of the pattern on the yellow fabric with the polka dots on the buttons is perfection.


And you'll never ever guess what this headboard was before Camila converted it!  Here's a little hint:


Look familiar?  That's right - it's a crib rail!  Camila and her husband picked it up off the curb in NYC and planned to use it as a trellis in their garden but when they needed something to re-purpose for the headboard, they grabbed it.  It's such a great idea and one I never would have thought of on my own.

And that's not the only great tip you'll get from this tutorial - instead of using foam batting as the "filling" for the headboard (it can be pricey and hard to work with), Camila used egg crate mattress pads.  Easy and inexpensive - so genius! 

You only need six things to complete this entire project and if you don't tuft the headboard, you'll just need four.  It doesn't get much simpler than that.


Now I know what I'll be doing with Gabrielle & Alaina's cribs when they outgrow them!

Get the full Baby Crib = Tufted Headboard How To HERE and be sure to check out the other fun features on High-Heeled Foot in the Door.  I can assure you that Camila is just as delightful in person as she seems on her blog!     

Images: High-Heeled Foot in the Door

Friday, July 9, 2010

FABULOUS FOR MOM FRIDAY: The Home Centric {DISCOUNT}

I love reading blogs.  Baby blogs, gossip blogs, fashion blogs.... I have so many subscriptions in Google reader that I can barely keep up.  But my latest obsession is home decorating blogs.  There are tons of wonderful ones out there - my current must reads are Centsational Girl, Decor 8, Eddie Ross, Hooked on Houses, House of Turquoise, Isabella & Max Rooms, Mudroom Boston, The Shabby Chic Cottage, The Shabby Nest & Thrifty Decor Chick - that it's easy to get bitten by the re-decorating bug.  Too bad we're not planning on renovating or redoing anything right now.  For someone like me who needs instant gratification, bookmarking all of the amazing ideas and inspiration photos for sometime the future just doesn't cut it.  I want to spice up my space and I want to do it now!

Luckily, I stumbled upon an easy and inexpensive answer to my design dilemma - decorative pillow covers from The Home Centric.  For less than $30 (and often less than $20!), you can transform any room in your home from blah to beautiful in no time at all.  Want to make a statement with some sparkle?  No problem!


Is your taste a bit more traditional?  The Home Centric has you covered, too.


Want to add some whimsy to your home?  Easy peasy with one of these fun designs.


I could go on and on posting gorgeous photos but take my word for it - whatever your design aesthetic is, The Home Centric has the perfect pillow cover for you.  If by some chance, you don't find what you're looking for, you can place a custom order, too.  With so many choices and such reasonable prices, you can use pillow covers from The Home Centric to change your decor to suit your every mood.  Consider my re-decorating itch scratched!


The Home Centric wants to help readers of AFOMFT get their home decorator on by offering a 10% discount on all purchases!  Just enter code AFOMFT10 in the message to seller box at checkout and the discounted amount will be refunded to you via Paypal.  Please note, the discount does not apply to shipping costs and the code is good through August 15, 2010.  Enjoy!

Images: The Home Centric

Monday, June 7, 2010

MULTIPLES MONDAY: Freezer Paper Stencil Tutorial

Welcome to MULTIPLES MONDAY, the CRAFTASTIC edition!  I wish I could take credit for this amazing tutorial but all of the kudos go to the uber talented Megan of MMMboppin'.  I found her blog after Lorie from the fabulous Be Different... Act Normal linked to one of my posts and Megan posted a comment in response.  She's a fellow-MoM so I automatically identified with her but once I saw her header....


I knew we were kindred spirits.  Any woman who quotes Hanson as words to love by is a friend of mine!

But enough about my bad taste in pop music.  Today's post is about some adorable TW-IN freezer stencil t-shirts Megan made.  You read that right - she made them!


And she tackled some TW-IN onesies too!


I know you want to make a set of your very own.  You're in luck because Megan's allowing me to feature her terrific Freezer Paper Stencil Tutorial here on AFOMFT!  And don't stop reading if you don't have twins.  You can make something fun for your little one - or yourself - too.  Let's get started!

Here's what you're going to need:


Freezer paper - you can buy this at the grocery store - it's like Waxed paper that's waxy only on one side

T-shirt or onesie

Exact-o knife 

Fabric paint

Sponge brush

A piece of cardboard

Something to cut on - a magazine will work

A design - For this onesie, Megan printed out an "S" for a friend's soon-to-arrive baby Susan.  You can find people's templates online, but she generally plays around with the fonts on her computer and gets free fonts at www.dafont.com. She also likes to use clip-art animal silhouettes.
And once you've got all the goodies handy, you're ready for the how-to:

    Step #1Cut a piece of freezer paper and tape it on top of your image. Place it so that the tape won't be on your image (ironing tape will make a sticky mess on your iron, so place the tape so you can cut or tear it off and not ruin your stencil later).


    Step #2: Begin cutting with your exact-o knife. The black parts are going to be the painted areas so cut away the black and keep all of the pieces that are white. When cutting the stencil, start by cutting away the pieces inside and working her way out. Throw away the black pieces that you won't need and hang onto the white parts that you will need as parts for your stencil later. Like this:


    Step #3: Once you're done cutting your stencil, prepare to iron it to your shirt. The waxy (it looks shiny) side of the paper needs to face the shirt when you begin ironing (keep that in mind when you are cutting your stencil!).  Megan secures the outline part of the stencil on the shirt first (she suggests looking at a copy of your design to help you figure out how it all needs to look).


    Step #4: Iron the inside parts of the stencil in place, so that the design looks the same as the one you started with (remember the parts that are black on your picture are the parts that will be painted).


    Step #5: Slide a piece of cardboard into the shirt to keep the paint from going through and then use your sponge brush to paint the shirt with fabric paint. Make sure you paint it pretty thick to cover the stencil well. Let the paint dry for at least 10-15 minutes.


    Step #6: After 10-15 minutes, peel off the stencil. If the paint is still wet, use caution so you don't smudge or smear it. First, grab a corner of the freezer paper and pull.  The outline stencil should peel right off the shirt. 


    To get the stencil pieces in the middle of the shirt that you're painted over, grab a pair of tweezers and pinch a piece of the inside stencil with them and pull. Works like a charm.


    Step #7: Take a step back and admire how dang cute your shirt turned out and imagine how adorable your favorite baby will look wearing it! Ta Da!


    Want to get a little fancier?  Try using a Cricut machine to cut out your stencils like Megan did for the stars above.

    For more great ideas and a daily dose of humor, be sure to visit Mmmboppin'.  Megan's blog is as catchy as the Hanson song it's named after, but a whole lot less embarrassing for me to admit to liking!

    If you try this project or have a CRAFTASTIC project of your own, we want to hear about it!  Send us an e-mail along with some pictures so we can feature your handwork here on AFOMFT

    Images: Mmmboppin'